RULE:
Don't waste grenades! Never use them on enemies.
1.
Warthog launch across the lightbridge gap. Set it up, and have p2 checkpoint
at the entrance to the cave. p2 should have 4 plasma grenades, and p1 should
have 8 grenades (one is placed underneath him so he picks it up when he
throws one.) DON'T TURN ON THE LIGHTBRIDGE.
Remember:
You need both warthogs all the way to the end. "Warthog launch"
means that both you and the warthog make it across the gap. Warthog launches
in this guide require 4 plasma, and 4 frag grenades underneath the nose of
the warthog.
2.
Cross the loading zone, checkpoint, and cross back. p2 will teleport.
3.
Set up another warthog launch back across the lightbridge gap. p2 should end
up with 3 plasma grenades, p1 should have none. Don't launch, head back
outside.
4.
Gather the two fragmentation grenades from the crashed escape pod in the
main area. Fill up on grenades in the rocky crash area (where there is no
blue beam structure.) The game will checkpoint right before the
marines head for the pelican, keep reloading and killing all of them until
both players have 8 grenades each.
5.
Have both players jump in the warthog that the pelican drops and head back
out to the main area. Don't enter any other areas!
6.
Lure one banshee back inside the tunnel. If you wait in the
entrance/exit hallway, a banshee will usually fly past you and down into the
hallway (out of view.) This will allow the game to checkpoint, making things
easier...
7.
Lure the banshee down into the actual lightbridge area. Get him stuck in the
pillars to the left by driving through them. Have p1 get out and walk away
from the banshee. Notice that it only pays attention to p2, who is waiting
in the warthog.
8.
Have p1 warthog launch back across the lightbridge gap. (This is where that
checkpoint in the tunnel entrace could have been very useful, since it will
probably drive you crazy trying to lure a banshee all the way from the main
outdoor area to the lightbridge every time you blow yourself up.) p1 should
have 8 grenades after the launch, p2 should still have 8 grenades too.
9.
Have p1 turn on the lightbridge.
10.
Have p1drive out of the lightbridge area and wait in the dark U-shaped
hallway (if you reach a gap in the floor, you've gone too far.) Have p2 kill
himself on the banshee, and make sure the grenades don't go anywhere where
you can't get them later. p1 should have 8 grenades, and p2 should spawn
near p1 with no grenades. Have p2 wait there.
11.
Have p1 drive back outside in the warthog. The game should checkpoint
near the tunnel entrance.
12.
Have p1 drive towards the beginning of the level. When he reaches the
"step," have him blast the warthog up the step using a plasma
grenade and a fragmentation grenade. Position the warthog near the second
step for another warthog blasting. p1 should have 6 grenades.
13.
Have p2 go back into the lightbridge room and jump off the ledge to the left
(killing himself.) He should spawn next to p1.
14.
Have p2 kill p1 so that his grenades (3 plasma, 3 frag) land near, or
underneath the warthog. Have both players pick up two grenades each (1
plasma, 1 frag.) 1 plasma grenade, and 1 frag grenade should be
sitting under the warthog. NOTE: Sometimes the shape of the rock near this
step allows for a blast that requires no grenades underneath the warthog.
Follow the next step anyway...
15.
Have p2 go back to the tunnel and checkpoint while p1 waits by the warthog.
After the checkpoint, have p1 toss a plasma and a frag, and blast the
warthog up the 2nd step. Revert to saved, as usual, if it doesn't work out.
16.
Have p1 go up and get in the warthog (p2 may be required for a boost.)
Wait approx 10-20 ft. from the step. Have p2 checkpoint in the tunnel
entrance again. p1 should have zero grenades, p2 should have a plasma and a
frag grenade.
17.
Have p2 frag-grenade jump across the gap that would normally be jumped with
a warthog in the tunnel.
18.
Have p2 go back to the warthog in the lightbridge room. Pick up the grenades
that were dropped when p2 was killed. Drive the warthog towards the end of
the level/ exit of the lightbridge room; a checkpoint should be triggered
immediately before the ramp out of the room.
The
banshee should still be in this room flying around. If he sees you before
you checkpoint, you might want to revert to saved and try again.
19.
Have p2 catch the banshee's attention and lure him back outside, towards the
beginning of the level.
20.
Lure the banshee to the left side of the pine tree near the left side of the
first step. He should get stuck between the wall and the tree, the warthog
should be able to slip through the space between the step and the tree. Have
p2 stand on the warthog and jump up on to the step. Have p2 lure the banshee
up on to the first step and get killed by the banshee while trying to reach
the 2nd step. p2 should respawn next to the warthog with p1 in it.
21.
Have p2 run forward, towards the beginning of the level, and towards the
left rock wall. The banshee SHOULD catch sight of p1 in the warthog and
begin to approach. Have p2 wait by the wall and/or hide. Have p1 lure the
approaching banshee between the two big rocks down the hill. The idea is to
get the banshee stuck, but keep his attention on p1.
22.
Have p2 go down to the 1st step and gather his grenades. p2 should have 8
grenades. Have p2 get in the warthog parked near the step and drive
down to the tunnel entrance. Now have p1 drive the warthog away from the
banshee and get out of sight of the banshee. Have p2 go into the tunnel
entrance and checkpoint. p1 can now drive back to the banshee...
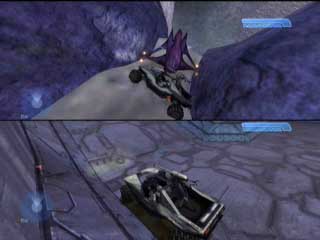
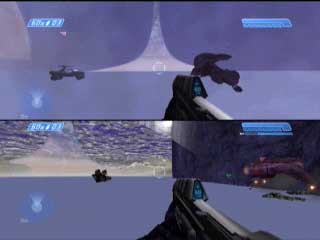
23.
Have p1 lure the banshee down to the river, and get in the position shown in
the first image below. The banshee should be pushing against the warthog's
right side on the last step before the waterfall. The warthog should rest
against the banshee, and not move. The warthog should not be pointing up or
down, but rather seem to be resting on it's side with the driver-side up.
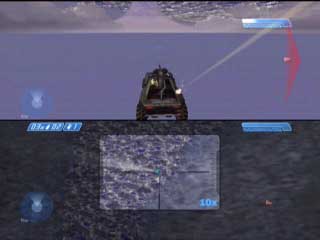
24.
Have p2 drive all the way back to the loading zone and get in position. Have
p1 drive full-force forward, with his aimer positioned for a right turn; if
done correctly, the banshee and the hog should still remain
"stuck." While p1 is in this position, have p2 drive through
the loading zone, and then drive QUICKLY back through the loading zone. The
banshee can turn in the period of time it takes to cross the loading zone
and then cross back, so be quick. After this is done, the banshee AI
will be disabled!
25.
You can have p2 drive back through the loading zone and checkpoint in the
tunnel entrance, if desired. Have p1 and p2 set up for a warthog launch back
over the lightbridge gap. There's should be a plasma grenade sitting near
the pillars where the banshee killed p2. Have p1 pick up the extra plasma
grenade. Take p1 back to the loading zone again to checkpoint...
26.
Cross the loading zone with p1, send p2 up to checkpoint, and position p1 at
the edge of the loading zone. This allows p1 to cross through the
loading zone quickly after reverting to saved after failed warthog launches.
27.
Warthog launch across the gap using p1 (who has the plasma grenade.) After
the launch, kill p2, spawn p2, and have him get in the warthog. Both players
should have zero grenades.
28.
Head back to the beginning of the level, you will checkpoint near the tunnel
entrance/exit. There should be at least 4 frag grenades in the area (3 on
the structure, 1 near the escape pod at the beginning.) Hopefully there will
be at least 4 plasma grenades on the ground in this area, but you are in ok
shape if you can find just one plasma grenade somewhere. If not, try editing
the above steps so that you end up with a total of 5 grenades at this point.
29.
Follow the method shown above (steps 12 through 16) for blasting the warthog
up the steps and checkpointing. Grenade counts might be different, but 2
grenades for the first step, and at least 3 for the second step should be
fine. (I bet you can do this with only 2 or 3 grenades if you try really
hard or get lucky.)
30.
Now you should be all set! Hopefully the banshee is in position (due to
steps 23 and 24) and you can push it down the final step of the waterfall by
driving the hog into it, and then driving full-force to the right.
If
the banshee gets pushed down low enough by the warthog, it should continue
to descend slowly. Ride it down and you're there!